OPENCV 를 이용한 카메라 캘리브레이션

이 글의 대부분의 내용과 코드는 OpenCV 의 Satya Mallick CEO 포스팅을 참고 하였다. (아래링크)
https://learnopencv.com/camera-calibration-using-opencv/
Camera Calibration using OpenCV | LearnOpenCV #
A step by step tutorial for calibrating a camera using OpenCV with code shared in C++ and Python. You will also understand the significance of various steps.
learnopencv.com
카메라 캘리브레이션
왜 카메라 캘리브레이션을 해야하는가?
카메라는 3차원 데이터를 2차원의 이미지로 만든다. (이 과정에서) 카메라 렌즈의 광학적인 특성, 렌즈와 이미지 센서와의 거리, 렌즈와 이미지 센서가 이루는 각 등, 카메라의 기구적인 부분에 의해서 오차가 발생한다. 카메라 캘리브레이션은 이러한 특성에 대한 다음 파라미터를 복구하는 것을 의미한다.
- 내부 파라미터 : focal length, optical center, and radial distortion coefficients of the lens.
- 외부 파라미터 : world coordinate system 기준의 카메라의 방향 (rotation and translation)
카메라 캘리브레이션의 결과물은?
- 카메라 내부 행렬 (intrinsic matrix, 3 by 3) : 초점거리, skew 값 (보통, 0), 이미지 평면에서 광학 중심의 x와 y 좌표에 대한 계수
- 외부 파라미터로써, 회전/이동에 대한 벡터값
OpenCV 카메라 캘리브레이션 예제
테스트환경
테스트를 위한 Host PC 에는 우분투 Ubuntu 18.04 와 OpenCV 4.2.0 가 설치되어 있다. OpenCV 4.2.0 설치는 아래 포스팅을 참고한다.
2022.06.10 - [프로그래밍/OpenCV] - [OPENCV] Ubuntu 18.04 OpenCV 4.2.0 설치하기
[OPENCV] Ubuntu 18.04 OpenCV 4.2.0 설치하기
Ubuntu 18.04 OpenCV 4.2.0 설치하기 OpenCV (Open Source Computer Vision)은 컴퓨터비전 개발을 위한 오픈소스 라이브러리이다. 초기에는 인텔이 개발하였기 때문에, CPU에서 가속되는 IPP(Intel Performa..
makepluscode.tistory.com
OpenCV CMake 작성
다음과 같이 CMakeLists.txt 를 작성한다.
cmake_minimum_required(VERSION 3.0)

project(camera_calibration)

find_package(OpenCV REQUIRED)

set(
    CMAKE_RUNTIME_OUTPUT_DIRECTORY
    ${CMAKE_HOME_DIRECTORY}
)

add_executable(
    ${PROJECT_NAME}
    src/main.cpp
)

target_include_directories(
    ${PROJECT_NAME}
 PRIVATE
    ${OpenCV_INCLUDE_DIRS}
)

target_link_libraries(
    ${PROJECT_NAME}
    ${OpenCV_LIBRARIES}
)
OpenCV 예제 코드 작성
다음과 같이 코드를 작성한다. 이 예제의 코드는 OpenCV 카메라 캘리브레이션 예제에서 대부분 가져왔다.
#include <opencv2/opencv.hpp>
#include <opencv2/videoio.hpp>
#include <opencv2/highgui.hpp>

#include <iostream>

using namespace std;
using namespace cv;

const int CHECKERBOARD[2]{8,6};

// orignal codes
// https://learnopencv.com/camera-calibration-using-opencv/


int main()
{
    // creating vector to store vectors of 3D points
    vector<vector<Point3f> > objpoints;

    // creating vector to store vectors of 2D points
    vector<vector<Point2f> > imgpoints;

    // Defining the world coordinates for 3D points
    vector<Point3f> objp;
    for(int i{0}; i<CHECKERBOARD[1]; i++)
    {
        for(int j{0}; j<CHECKERBOARD[0]; j++)
        objp.push_back(Point3f(j,i,0));
    }

    vector<String> images;
    string path = "./images/*.jpg";

    glob(path, images);

    Mat frame, gray;
    // vector to store the pixel coordinates of detected checker board corners
    vector<Point2f> corner_pts;
    bool success;

    // Looping over all the images in the directory
    for(int i{0}; i<images.size(); i++)
    {
        frame = imread(images[i]);
        cvtColor(frame, gray, COLOR_BGR2GRAY);

        // Finding checker board corners
        // If desired number of corners are found in the image then success = true
        success = findChessboardCorners(gray, Size(CHECKERBOARD[0], CHECKERBOARD[1]), corner_pts,
        CALIB_CB_ADAPTIVE_THRESH | CALIB_CB_FAST_CHECK | CALIB_CB_NORMALIZE_IMAGE);

        /*
        * If desired number of corner are detected,
        * we refine the pixel coordinates and display
        * them on the images of checker board
        */
        if(success)
        {
            TermCriteria criteria(TermCriteria::EPS | TermCriteria::MAX_ITER, 30, 0.001);

            // refining pixel coordinates for given 2d points.
            cornerSubPix(gray,corner_pts,Size(11,11), Size(-1,-1), criteria);

            // Displaying the detected corner points on the checker board
            drawChessboardCorners(frame, Size(CHECKERBOARD[0], CHECKERBOARD[1]), corner_pts, success);

            objpoints.push_back(objp);
            imgpoints.push_back(corner_pts);
        }

        imshow("Image",frame);
        waitKey(0);
    }

    destroyAllWindows();

    Mat cameraMatrix,distCoeffs,R,T;

    /*
    * Performing camera calibration by
    * passing the value of known 3D points (objpoints)
    * and corresponding pixel coordinates of the
    * detected corners (imgpoints)
    */
    calibrateCamera(objpoints, imgpoints, Size(gray.rows,gray.cols), cameraMatrix, distCoeffs, R, T);

    cout << "cameraMatrix : " << cameraMatrix << endl;
    cout << "distCoeffs : " << distCoeffs << endl;
    cout << "Rotation vector : " << R << endl;
    cout << "Translation vector : " << T << endl;

    return 0;
}
위 예제 코드의 간단한 설명은 다음과 같다.
- Checkerboard 의 행과 열을 지정한다.
- images 디렉토리에서 이미지를 읽어서 Grayscale 로 변경한다.
- findChessboardCorners 함수를 사용하여 Checkboard 의 Corner 를 찾는다.
- cornerSubPix 함수를 사용하여 서브픽셀(sub-pixel) 수준의 정확도로 Corner 를 찾는다.
- 이미지에 Corner 을 표시해서, 화면에 출력한다.
- calibrationCamera 함수를 사용해서 파라미터를 계산한다.
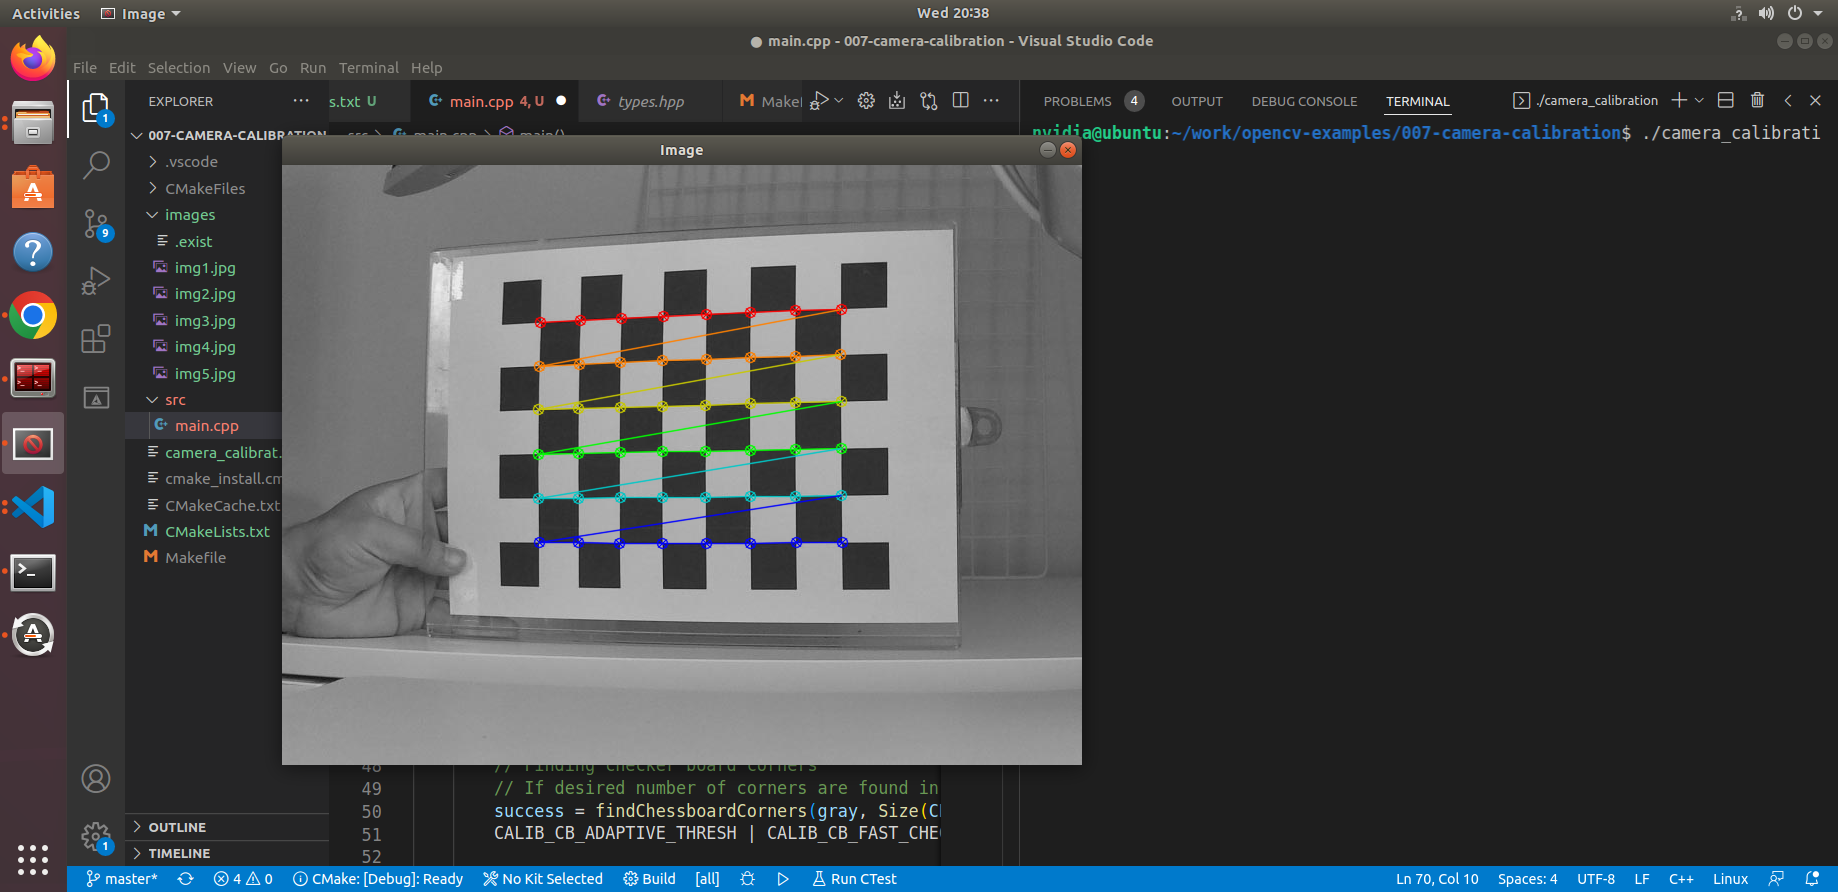
실행결과
촬영된 이미지 5장으로 테스트 해본 결과, Checkboard 의 Corner 를 정확히 찾는 것을 확인했다.
calibrationCamera 함수를 통해 나온 결과 값을 출력해보았다.
- Camera matrix : intrinsic matrix, 3 by 3
- DistCoeffs : 렌즈 왜곡 계수(Lens distortion coefficients)
- Rotation vecter : vecter 의 방향은 회전 축을 나타내고, vecter 의 크기는 회전 각을 의미함
- Traslation vecter : 3×1 이동 벡터
cameraMatrix : [1419.673553625388, 0, 666.5701993152168;
 0, 1415.434417595669, 284.9011670630352;
 0, 0, 1]
distCoeffs : [-0.3779621578852622, -0.2007498881012056, 0.004339110290547984, 0.008265047579380602, 0.3210188752313808]
Rotation vector : [-0.04921945832888441, 0.09042061735983889, -0.01361057335763333;
 0.1094626022511151, -0.2364625870132943, 0.01511276184908101;
 -0.7561441242383266, -0.0191527714636694, -0.01635873679689486;
 -0.1974511394522911, 0.317556005715105, 0.00806347329801513;
 -0.01648285582559398, -0.4071043497289479, -0.0004094631477898205]
Translation vector : [-9.288717016952614, -2.924750005078209, 30.77031491782794;
 -7.520929633143403, -2.737341461240362, 22.08581450740244;
 -9.32667316529024, -1.038393033132518, 35.11557599377031;
 -6.781851248836779, -2.790762349622213, 32.77846233201987;
 -10.19296762260887, -2.866343503694881, 32.372707988489]
참고자료
전체 코드는 makepluscode github 를 참고한다.
https://github.com/makepluscode/opencv-examples/tree/master/007-camera-calibration
이 글의 대부분의 내용과 코드는 OpenCV 의 Satya Mallick CEO 포스팅을 참고 하였다. (아래링크)
https://learnopencv.com/camera-calibration-using-opencv/
Camera Calibration using OpenCV | LearnOpenCV #
A step by step tutorial for calibrating a camera using OpenCV with code shared in C++ and Python. You will also understand the significance of various steps.
learnopencv.com
'프로그래밍 > OpenCV' 카테고리의 다른 글
| OpenCV 카메라 FPS 구하는 예제 코드 (0) | 2022.11.04 |
|---|---|
| opencv4nodejs 을 이용한 개발환경 구축 (0) | 2022.11.03 |
| [OPENCV] 카메라 이미지 왜곡보정 (0) | 2022.06.18 |
| [OPENCV] SGBM vs StereoBM 깊이맵 결과 비교 (1) | 2022.06.15 |
| [OPENCV] 스테레오 깊이맵 성능 높이기 (0) | 2022.06.15 |
| [OPENCV] GSTREAMER 를 이용한 이미지 캡처 (0) | 2022.06.13 |
| [OPENCV] 스테레오 카메라 StereoBM 예제 첫번째 (0) | 2022.06.12 |
| [OPENCV] Ubuntu 18.04 OpenCV 4.2.0 설치하기 (0) | 2022.06.10 |


