OPENCV GSTREAMER 를 이용한 이미지 캡처

OpenCV 에서 GSTREAMER 파이프라인을 이용한 이미지 캡처 방법
테스트환경
테스트를 위한 Host PC 에는 우분투 Ubuntu 18.04 와 OpenCV 4.2.0 가 설치되어 있다. OpenCV 4.2.0 설치는 아래 포스팅을 참고한다.
2022.06.10 - [프로그래밍/OpenCV] - [OPENCV] Ubuntu 18.04 OpenCV 4.2.0 설치하기
[OPENCV] Ubuntu 18.04 OpenCV 4.2.0 설치하기
Ubuntu 18.04 OpenCV 4.2.0 설치하기 OpenCV (Open Source Computer Vision)은 컴퓨터비전 개발을 위한 오픈소스 라이브러리이다. 초기에는 인텔이 개발하였기 때문에, CPU에서 가속되는 IPP(Intel Performa..
makepluscode.tistory.com
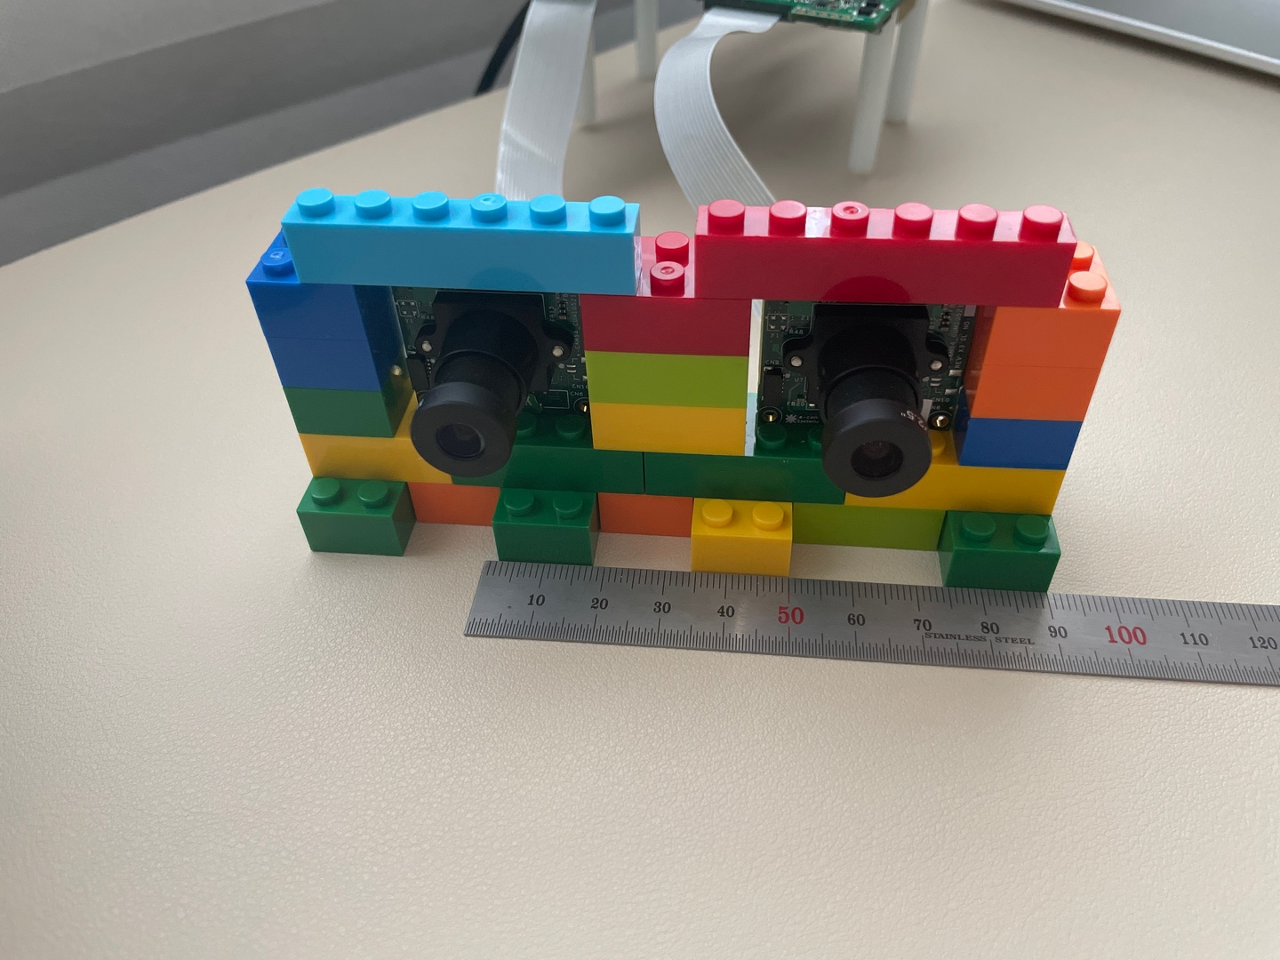
이 예제는 MIPI_CAMERA 선언에 따라서 2가지 플랫폼에서 테스트 되었다.
- Host PC + Ubuntu 18.04 + 카메라 연결 안한 상태에서 videotestsrc (MIPI_CAMERA 선언 해제)
- Jetson Xavier NX + 2 MIPI camera + Jetpack 4.6 (MIPI_CAMERA 선언 필요)
OpenCV CMake 작성
다음과 같이 CMakeLists.txt 를 작성한다.
cmake_minimum_required(VERSION 3.0)

project(stereo-capture)

find_package(OpenCV REQUIRED)

set(
    CMAKE_RUNTIME_OUTPUT_DIRECTORY
    ${CMAKE_HOME_DIRECTORY}
)

add_executable(
    ${PROJECT_NAME}
    src/main.cpp
)

target_include_directories(
    ${PROJECT_NAME}
 PRIVATE
    ${OpenCV_INCLUDE_DIRS}
)

target_link_libraries(
    ${PROJECT_NAME}
    ${OpenCV_LIBRARIES}
)
OpenCV 예제 코드 작성
다음과 같이 GSTREAMER 파이프라인을 이용한 이미지 캡처 코드를 구현한다.
#include <opencv2/opencv.hpp>
#include <opencv2/videoio.hpp>
#include <opencv2/highgui.hpp>

#include <iostream>

using namespace std;
using namespace cv;

//#define MIPI_CAMERA

int main()
{
#ifdef MIPI_CAMERA
    const char* gst_l = "v4l2src device=/dev/video0 ! video/x-raw, format=(string)UYVY, width=(int)1280, height=(int)720 ! \
        nvvidconv ! video/x-raw(memory:NVMM), format=(string)I420 ! nvvidconv ! appsink";
    const char* gst_r = "v4l2src device=/dev/video1 ! video/x-raw, format=(string)UYVY, width=(int)1280, height=(int)720 ! \
        nvvidconv ! video/x-raw(memory:NVMM), format=(string)I420 ! nvvidconv ! appsink";
#else
    const char* gst_l = "videotestsrc pattern=ball ! video/x-raw,width=1920,height=1080 ! videorate ! video/x-raw, \
        framerate=5/1 ! appsink";
    const char* gst_r = "videotestsrc pattern=ball ! video/x-raw,width=1920,height=1080 ! videorate ! video/x-raw, \
        framerate=5/1 ! appsink";
#endif

    // cout << getBuildInformation() << endl;
    setenv("GST_DEBUG", "*:3", 0);

    VideoCapture cap1(gst_l);
    VideoCapture cap2(gst_r);

    if(!cap1.isOpened() || !cap2.isOpened())
    {
       cout << "Failed to open camera(s)" << endl;
       return -1;
    }

    namedWindow("Left", WindowFlags::WINDOW_AUTOSIZE);
    namedWindow("Right", WindowFlags::WINDOW_AUTOSIZE);

    Mat img1, img2;

    while(1)
    {
        if (!cap1.read(img1) || !cap2.read(img2))
        {
            cout<<"Failed to read error"<<endl;
            break;
        }
        else
        {
            imshow("Left", img1);
            imshow("Right", img2);

            char key = waitKey(1);

            if(key == 27)
            {
                cout << "Exit" << endl;
                break;
            }
            if(key == 13)
            {
                static int num = 0;
                vector<int> params_jpg, params_png;
                params_jpg.push_back(IMWRITE_JPEG_QUALITY);          //JPG로 화질 설정
                params_jpg.push_back(95);
                imwrite("./images/left"  + std::to_string(num) + ".jpg", img1, params_jpg);
                imwrite("./images/right" + std::to_string(num) + ".jpg", img2, params_jpg);
                num++;
            }
        }
    }

    cap1.release();
    cap2.release();

    return 0;
}
위 예제 코드의 간단한 설명은 다음과 같다.
- gstreamer launch 명령어로 VideoCapture 객체를 생성한다.
- VideoCapture 통해서 image 를 캡처한다.
- Enter 가 눌리면 image 를 저장한다.
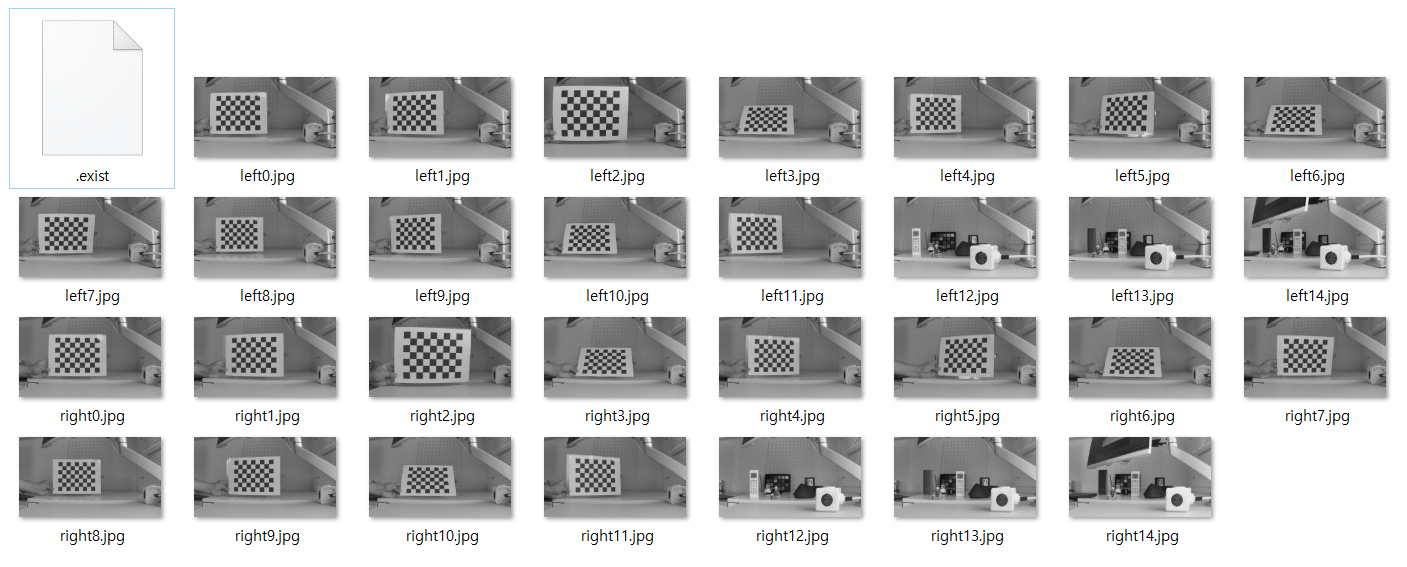
실행결과
Jetson 예제를 실행 후에 Enter 버튼으로 2개의 카메라에서 image 를 캡처한 결과이다.
참고자료
전체 코드는 makepluscode github 를 참고한다.
https://github.com/makepluscode/opencv-examples/tree/master/006-stereo-camera-capture
GitHub - makepluscode/opencv-examples
Contribute to makepluscode/opencv-examples development by creating an account on GitHub.
github.com
'프로그래밍 > OpenCV' 카테고리의 다른 글
| [OPENCV] SGBM vs StereoBM 깊이맵 결과 비교 (1) | 2022.06.15 |
|---|---|
| [OPENCV] 스테레오 깊이맵 성능 높이기 (0) | 2022.06.15 |
| [OPENCV] 스테레오 카메라 StereoBM 예제 첫번째 (0) | 2022.06.12 |
| [OPENCV] Ubuntu 18.04 OpenCV 4.2.0 설치하기 (0) | 2022.06.10 |
| [OPENCV] MAT 클래스 type 이해하기 (0) | 2022.06.10 |


